Ich habe hier mal einen Hilfeartikel für das Webmail verfasst, wo verschiedene Einstellmöglichkeiten zusammengefasst sind. Wichtig, ich bin kein Swisscom Mitarbeiter und habe diesen Artikel freiwillig geschrieben in der Hoffnung anderen Kunden helfen zu können. Hier über das neue Webmail zu lästern ist also unfair. Fragen und Anregungen sind hingegen gerne gesehen.
1. Wechseln zwischen Verschiedenen Adressen
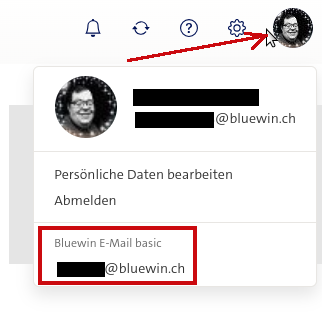
Um zwischen verschiedenen Adressen zu wechseln, klickst Du rechts oben auf den Profilbutton. In meinem Beispiel ist das jetzt ein Bild. Das kann aber auch 1 oder 2 Buchstaben sein. Ganz unten sind dann die jeweiligen anderen Adressen gelistet.
2. Mehrere Mails markieren, löschen
Um mehrere Mails auszuwählen, gibt es verschiedene Lösungen
- CTRL gedrückt halten und die mails einzeln markieren. Ideal wenn man vereinzelte mails im Posteingang auswählen will.
- Shift gedrückt halten und die erste bzw. letzte Mail anklicken. So wird ein ganzer Block markiert.
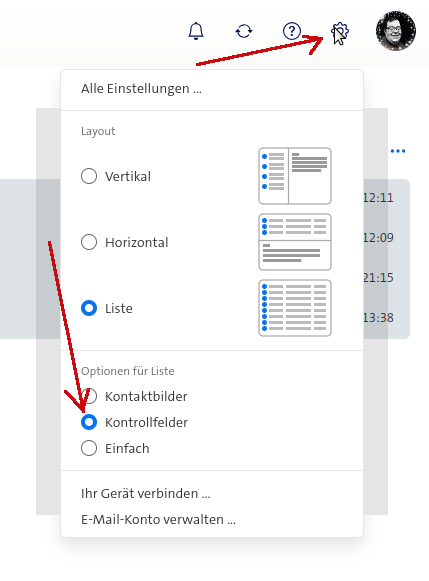
- Checkboxen aktivieren. Hierzu klickt ihr auf das Zahnrad und wählt dann unten wie ich Kontrollfelder (Wichtig hier kann man nur eine Option wählen)
Mit DEL löscht ihr nun die Mails. Per Drag&Drop könnt ihr die Mails auch in einen Archivordner verschieben. Wichtig das Archiv entlastet nicht den Speicherplatz, sondern dient nur der Übersichtlichkeit innerhalb der aktiv bewirtschafteten Mailordner.
3. Datum und Uhrzeit anzeigen
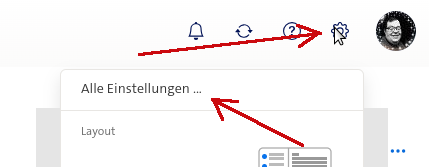
Um Datum und Uhrzeit der Mails anzuzeigen klickst Du auf das Zahnrad und wählst dann Alle Einstellungen ganz zuoberst:
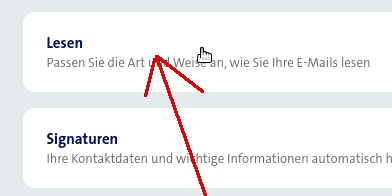
Im neuen Fenster öffnest Du dann den Bereich Lesen mit einem Klick auf auf den Kasten:
Jetzt findest Du verschiedene Optionen vor:
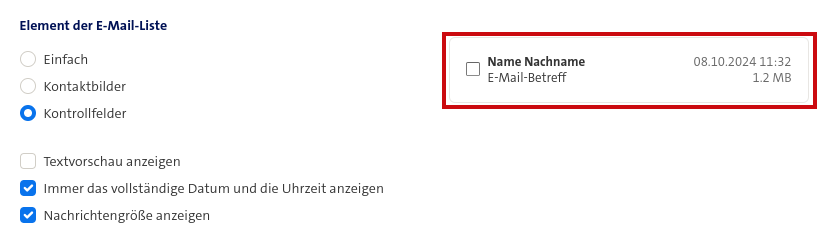
Hier kannst Du nun die gewünschte/n Option/en aktivieren und deaktivieren. Im (von mir rot eingerahmten Kasten) siehst Du eine Vorschau, wie das dann im Webmail aussieht.
4. Nachrichtengrösse anzeigen
Um die Nachrichtengrösse der Mails anzuzeigen klickst Du auf das Zahnrad und wählst dann Alle Einstellungen ganz zuoberst:
Jetzt findest Du verschiedene Optionen vor:
Hier kannst Du nun die gewünschte/n Option/en aktivieren und deaktivieren. Im (von mir rot eingerahmten Kasten) siehst Du eine Vorschau, wie das dann im Webmail aussieht.
5. Textvorschau deaktivieren:
Um die Textvorschau zu deaktivieren, klickst Du auf das Zahnrad und wählst dann Alle Einstellungen ganz zuoberst:
Jetzt findest Du verschiedene Optionen vor:
Hier kannst Du nun die gewünschte/n Option/en aktivieren und deaktivieren. Im (von mir rot eingerahmten Kasten) siehst Du eine Vorschau, wie das dann im Webmail aussieht. In meinem Beispiel ist Textvorschau bereits deaktiviert.
6. Adressbücher kopieren:
Im neuen Webmail verfügt jede Adresse über ihr eigenes Adressbuch. Man kann aber das Adressbuch einer Adresse problemlos Exportieren und bei einer anderen Adresse wieder Importieren.
Zuerst das Exportieren:
- Adressbuch öffnen mit einem Klick auf das auf das entsprechende Icon im Webmail =>

- Das gewünschte Adressbuch links auswählen (Gesammelte Adressen oder Kontakte)
- Auf das Icon… drücken
- Exportieren wählen
- Auf exportieren klicken
- vcf Datei auf dem Computer speichern
Und dann das Importieren:
- Adressbuch öffnen mit einem Klick auf das auf das entsprechende Icon im Webmail =>
- Das gewünschte Adressbuch links auswählen (Gesammelte Adressen oder Kontakte)
- Auf das Icon… drücken
- Importieren wählen
- Datei hochladen wählen
- Die entsprechende vcf Datei auf dem PC auswählen
- Importieren wählen
- Das eigentliche Importieren kann dann einen paar Augenblicke dauern